

Squadron Dispatch #12
Updated: May 22

Dear Squadron Pilots,
Welcome back to Squadron Dispatches! Today we're going to look at a vital piece of the manufacturing process: the colour and decal specs and the squadrons they represent.
New to the Squadron? You can read all previous Squadron Dispatches on the blog at AngelsOneSix.com/blog.
Colour Specs and MArkings
It's all very well having a beautiful sculpt of an aircraft, but unless the factory knows what colours to paint it and what decals you'll need to individualise its callsign ID markings, it's going to look very plain on the table! So, what's the process? Let's look at the Spitfire as an example.

Spitfire Plans
Well, first I need an accurate set of plans for the model. The drawings I provided the sculptor are a good start, but there are inevitably slightly different from the final product, so they need updating to match the reality of the model. With these in hand and a whole raft of source photographs and secondary interpretation of what the camo looked like, it's time to draw that onto the plans. Fortunately, both Britain and Germany used standardised camouflage schemes, so every aircraft looked the same (well, half of them anyway—more about that later).

Spitfire Camouflage Scheme
But wait, there's one further complication—picking the colours. There are lots of issues here, not least being the variation in colour samples that experts have taken from original aircraft and the official swatches, but also the effects of scale and sunlight. Let's tackle scale first. Small things look darker than big things, even if they are identical in colour, and distant things and things in bright sunlight tend to change colour as well. So, even if there is agreement on what the colour should be (I wish!), I can't use that without allowing for scale, otherwise the result would be way too dark. Photos and videos of restored aircraft are useful here as they show what the colour scheme looks like in practice.

Spitfire Camouflage and Markings
So, we have the colours and the camouflage scheme drawn on the plans, what's next? We now need to add the markings. Now, the Battle of Britain was an interesting time for markings as both the British and Germans were still in transition between their prewar ideas and the later standards that everyone would recognise. In the case of the Spitfire, things changed rapidly around the Battle of France and the start of the Battle of Britain.
At the start of the year, the undersides of Spitfires (and Hurricanes) were painted half black and half white to make identifying friendly aircraft easy for the Observer Corps who tracked raids over land once they crossed inland out of the coastal radar system. Just before the Battle of France, this changed to a strange colour called duck-egg blue (which was a greenish colour!). Then, a little after this, they decided to add roundels to the undersides of the wings, and even later, to add yellow circles around the fuselage roundels. Meanwhile, the roundels on the top wings lost their white band between the red and blue. With all of these changes, no two squadrons were quite alike, and often aircraft within a squadron differed too.
These Spitfires are right in the middle of all of these changes. They have the new duck-egg blue undersides, but don't have either the yellow bands or the under-wing roundels, but they do have the red-white-blur flash on the tail fin (oh, I forgot to mention that change too!).

Spitfire Colour Specifications
Finally, it's time to get to the squadron and individual aircraft markings. That's where things really get fun, at least from my viewpoint. I need to pick a squadron and find photos to see how they marked their aircraft. Now, later if became quite standardised, but just before the Battle of France, the orders came through that every aircraft should have a two-letter squadron code on one side of the fuselage roundel and a individual aircraft letter on the other side. Yep, that's incredibly ambiguous, and every combination that could meet those specs was used!

Spitfire Decal Sheet
For No. 54 Squadron, the one I chose, they used what would later become standard. The squadron code on the left and the aircraft letter on the right. With the small Spitfire fuselage, fitting this in with decent-sized letters was a challenge! These markings are then made into a decal sheet. This will be a small sheet of waterslide decals that you use to customise each aircraft. Each sheet covers a pair of models, with some extras in case of accidents!

Spitfire Sticker Sheet
With the decals finalised, its time to tie everything together. That's where the sticker sheet comes in. The stickers label the cockpit display and the flight stand to match the aircraft. Now, it's easy to see which goes with what from across the table.


Cockpit and Flight Stand for Spitfire KL A

Lastly, with everything specified, it was time to paint up a sample and post it off to China, along with all the diagrams.
Fortunately, my skill with a brush wasn't critical, and with a bit of luck and a few attempts, we got a close match and were ready to go!
Supermarine Spitfire Mk I—No. 54 Squadron
Let's look at No. 54 Squadron in a little more detail and see why I chose it.
Choosing No. 54 Squadron for the Spitfire was a no brainer for me. Two of New Zealand's top aces, Alan Deere and Colin Gray, flew with the squadron in the Battle of Britain and their autobiographies provide a wealth of fascinating anecdotes that will become part of the campaign pack.

Flying Officer Al Deere—whose Spitfire, Kiwi III, graces our box art—earned a DFC for escorting his squadron leader, who was flying a two-seat trainer, over to Belgium to pick up the downed squadron leader of their neighbouring squadron from behind enemy lines! The aircraft is labelled Kiwi III because Deere had already lost two aircraft, and went on to lose three more during the Battle of Britain (he called his autobiography Nine Lives!).

The choice was made even simpler by the fact that they were one of the few Spitfire squadrons that fought over Dunkirk, then took part in all phases of the extended battles that became known as the Battle of Britain. The decal sheet has the squadron code, KL, and a selection of aircraft codes, and for Deere's KL B, the Kiwi he painted on his first three aircraft!
Hawker Hurricane Mk I — No. 56 Squadron
The choice of squadron for the Hurricane was a bit harder. There were so many interesting squadrons: Douglas Bader's Canadian 242 Squadron, the Polish 303 Squadron, the American 71 Squadron, and the Czech 310 Squadron to name a few.
In the end, I went with No. 56 Squadron for three reasons, none of them compelling on its own, but together, enough to sway my pick. Firstly, 56 Squadron had the squadron code 'US', and having a British aircraft labelled 'US A' tickled my fancy. Secondly, 56 Squadron went back to the First World War where flew the magnificent S.E. 5a and its aces included Ball, McCudden, Rhys-Davids, Maxwell, and the Canadian Hoiges. Finally, its markings were just a little odd.


Hurricane Colours and Markings
The order in which 56 Squadron complied with all the new marking regulations shows in some of the results. The big squadron code and individual letters around the roundel came first. Then, when the instruction came to add the yellow circle, they'd already painted the squadron code, 'US', quite close to the roundel, so the new yellow ring (much wider than it would later be) touched, or in some cases overlapped, the letters. And, because the instructions on the tail flash weren't very explicit, they painted a very narrow and tall tail flash, unlike the more typical one used by the Spitfires of 54 Squadron.
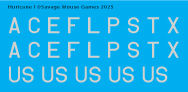
Hurricane Decal Sheet
Because the Hurricane and Spitfire look very similar at a distance, especially to those who aren't warbird nuts like me, the aircraft code letter on the sticker sheet is red for the Hurricane. That makes it easy to pick your Hurricanes from someone else's Spitfires on the far side of the table.

Hurricane Sticker Sheet
Something else you may notice about the Hurricanes is that their camouflage is almost a mirror image of the Spitfire's. That's because the British, not wanting every aircraft to be identical, created what they called the A and B camouflage schemes that were mirror images of each other. Every second aircraft was to be in the A scheme and the others in the B scheme. Unfortunately, due to manufacturing limitations, all aircraft of one type are in the same scheme, so the Spits are in one and the Hurribirds in the other.
Handley Page Hampden — No. 50 Squadron
British twin-engined bombers like the Hampden normally operated at night. However, their desperation in the middle of 1940 was such that they made daylight raids to bomb advanced German airfields, tank columns, and later invasion barges in French and Belgian ports.
I picked No. 50 Squadron for the Hampden as they were operating at this time and had some unusual marking practices. They were one of the squadrons that deviated from the norm and put the aircraft letter on the fuselage ahead of the roundel and the squadron code on the boom aft of it on both sides. Well, not in every case, as there are also photos of some aircraft with the more normal arrangement, but I think they are from a later period.

Hampden Colours and Markings
Because the twin-engined Hampden has the fuselage sides hidden behind the engines in the side views, I had to draw a wingless profile as well to show the hidden areas. One of the things that China initially faced that i hadn't thought about, though, was the camouflage scheme on the inside of the engines and how to handle the inside of the gunner's hood, the open slot for the radio operators guns underneath the aircraft, and the fronts of the engines. This version shows the solution. I added another four scrap drawings to cover these—I had however already worked out the need for the inside tail fins!
Unlike the fighters that have nine different aircraft code letters, the Hampden only has five. Players aren't likely to fly more than four in the same mission, so more would be a waste.

Hampden Decal Sheet
Messerschmitt Me 109 E-4 — 9. Staffel, III./JG 26
When I was looking for suitable markings for the Messerschmitt Me 109, I came across some photos and information on the crash landing of Oberleutnant Willi Fronhöfer in Yellow 10 in Kent on the 31st of August (https://www.keymilitary.com/article/ulcombes-war). I'm always a sucker for a good story, and the red hellhound on the side cinched the choice.


A bit of research revealed that Willi flew with the 9th Staffel (squadron) of Jagdgeschwader 26 (26th Fighter Wing), so that became the squadron I chose. Jagdgeschwader 26 was commanded by the famous ace, Adolf Galland. It would later be one of the main opponent's of the RAF and USAAF, becoming known as the 'Abbeville Boys' from their airfield's location, or less politely as the 'Yellow-nosed Bastards' from their recognition markings.

Me 109 Colours and Markings
These aircraft are in an interesting intermediate stage for the Luftwaffe. They've repainted the black green you'll see on the other German aircraft to a greenish grey to lighten the colour against the sky when dogfighting, and extended the light blue underside up the sides for further camouflage. At this point, they still hadn't moderated the light blue sides with a mottling of grey, nor added the yellow recognition markings on the nose and tail that would come later.

Me 109 Decal Sheet
Compared with the British, the German markings are colourful, with the black-outlined yellow numbers of the 9th Staffel and the vertical bar of the 3rd Group. The red hellhound of 9th Staffel adds another splash of colour.
Messerschmitt Me 110C — 8. Staffel, III./ZG 76
Göring's Zerstörer—the 'Destroyer' heavy fighters built to sweep the skies—were Germany's elite during the invasions of Poland and France. As such, they often carried aggressive markings such as the wasp emblem of the 8th Staffel of Zerstörergeschwader 76 (76th Destroyer Wing).

Me 110 Colours and Markings
The markings of the 8th Staffel are unusual as the final N would normally be the marking of the 5th Staffel, and rather than the wing code 2N, ZG 76 usually had the code M8. This oddity came about because the whole third group of ZG 76 (7, 8, and 9 Staffeln) was originally the second group of ZG 1 (4, 5, and 6 Staffeln). When they changed wing, they kept their old markings.
The Me 110 decal sheet is the biggest of all. They have a long four-part code on the side of the fuselage, with the 2N being the wing's code, and the final black N as the Staffel (squadron) code. The red letter is the individual aircraft ID code in the Staffel colour. This aircraft ID letter is then repeated on the upper and lower surfaces of the wings.

Me 110 Decal Sheet
There is also the Wespe—the wasp emblem—on the nose, inherited from ZG 1. Later, this would become a single ferocious-looking wasp, but in 1941 it was a swarm of three wasps flying above the clouds. It's a lot of markings for a large aircraft, but the result is striking.
You'll notice that the Me 110 (and the following Ju 87) have different camouflage from the Me 109. The low contrast between the dark green and black green and overall dark shade is a common feature of German camouflage at the time. Their tanks had a dark brown camouflage over a dark grey base, for example. While it provides good camouflage while parked under trees when dispersed around the airfield, and probably works well against the ground when seen from above, it looks odd to eyes used to the more contrasting British and American camouflage. Interestingly, the single-engined Me 109s started in this camouflage, but then adjusted it based on experience in their air superiority role.
Junkers Ju 87 B-1 Stuka — 4. Staffel, II./StG 1
For the Ju 87 B-1 'Stuka' dive bombers, I wanted colourful markings belonging to a formation that took part in as much of the campaign as possible. The Stukas (short for Sturzkampfflugzeug or dive bomber) of 4th Staffel, Stukageschwader 1 match that description well with their yellow comet and bull insignia.
Like the Me 110 scheme I picked, the Stukas of the 4th Staffel, Stukageschwader 1 were originally in a different wing. The whole of the third group of StG 51 was transferred to become the second group of StG 1. Like 8. ZG 76, 4. StG 1 retained its old StG 51 code, in this case 6G, rather than switching to the StG 1 code, A5, and kept the 7th Staffel letter R rather than the 4th Staffel letter M.

Ju 87 B-1 Stuka Colours and Markings
The camouflage scheme used by the Stuka is essentially the same as that used by the Me 110, with angular black green and dark green swatches on the upper surfaces and light blue undersides. The big difference is in the individual aircraft letter. In this case, it's in the 4th and 7th Staffel colour, white, rather than the 5th and 8th Staffel colour, red.
Unlike the Me 110, Stukas don't generally seem to have displayed their aircraft code on the upper wing—possibly because, flying in formation, they didn't need to identify each other from such a wide variety of angles. They did, however, display the letter on the underside of the wings, but in black rather than white so that it would stand out against the pale light blue.

Ju 87 B-1 Stuka Decal Sheet
Blackburn Skua and Heinkel He 111
The last two aircraft in the Battle of Britain release are the British Blackburn Skua dive bomber (yes, it is odd that the British named their dive bomber after a bird, the Skua which looks and sounds similar to the German word Stuka!) and the German Heinkel He 111 twin-engined bomber. Both have been sculpted, but neither have their markings drawn yet, so they'll get their own article in a future dispatch.

Skua Render

Skua Plan
Signing Off
Wow, that was a longer treatise than I expected, so I'll stop here and save the other couple of things I was going to talk about: the final Hurricane and Hampden prototypes and the campaign flight management app, for the next dispatch.
Meanwhile, if you have questions or just want to talk about the game or the warbirds of WW2, join the discussion at facebook.com/groups/AngelsOneSix or discord.gg/6WFTv9m3HD.
Keep your eyes peeled for bandits and watch your six!
Red Leader, Out.
Phil Yates
Designer, Angels One Six


Comments